Overview
TopTeam Web Application Server is a platform that helps you access TopTeam Repository through your browser.
TopTeam Web Application Server is an ISAPI-dll that needs to be deployed on Internet Information Services (IIS).
In this article, you will learn to install and configure TopTeam Web Application Server on the IIS.
Who should read this?
- TopTeam Administrators
- IT Support
System Requirements for TopTeam Web Application Server
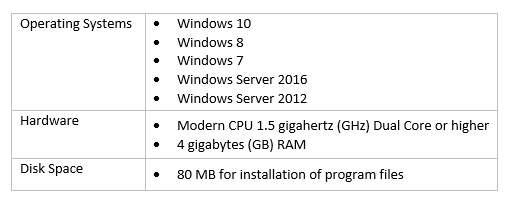
Refer to the article System Requirements for the TopTeam Web Server.
This article provides the recommended system requirements for installing TopTeam Web Application Server.
NOTE: If the server computer is not configured based on the recommended system requirements, the performance of the web server might slow down.
Prerequisites
- TopTeam Application Server has already been installed and running.
- For Microsoft IIS, ensure that WebDAV Publishing is unchecked and the features are turned ON as shown in the image below:

Installation Process Overview
- Verify that TopTeam Web Application Server you have downloaded is compatible with your current TopTeam Database Schema version.
- Install the new TopTeam Web Application Server files from the zip file you have downloaded.
- Configure TopTeam Web Application Server using Management Console for TopTeam Web Server.
- Create and configure a website for TopTeam Web on IIS.
Preparations
- Log into the computer where you want to install TopTeam Web Application Server as a Windows User that has Windows Administrator privileges.
- If TopTeam Application Server is running on another computer, ensure that TopTeam User Data Files Folder is accessible from that computer.
- If you are using Oracle or SQL Server as your database server, verify that the client library required to connect to the database server has been installed on your computer. Also verify that you are able to connect to TopTeam Database Schema.
- Download the TopTeam Web Application Server – ISAPI Edition zip file from the TechnoSolutions Customer Portal (access to Customer Portal is available only to licensed customers) or any other download link provided to you.
1. Verify TopTeam Web Application Server compatibility with your current TopTeam Database Schema Version
1.1. Find the current version of TopTeam Database Schema installed in your organization
Refer to the article How to find TopTeam Database Schema Version.
1.2. Verify that TopTeam Web Application Server is compatible with the TopTeam Database Schema version installed in your organization
You can find out the compatible TopTeam Database Schema version of the new TopTeam Web Application Server from the zip file name.
The zip file name can be of the following format:
TopTeamWeb_Lic_<<Database>>_ISAPI_<<Version Number>>_MinDB<<DB Version Required>>_DDMONYY.zip
E.g. TopTeamWeb_Lic_SQL_ISAPI_9.20_MinDB9.0_04Nov15.zip
In the example above:
SQL – indicates that this TopTeam Web Application Server is for SQL Server Database.
Other possible value is Ora for Oracle.
IMPORTANT: If the database type indicated in the zip file name is different from TopTeam Database installed in your organization, you have downloaded the incorrect file. Please download the correct file and try again.
9.20 – is the version number of TopTeam Web application.
DB9.0 – is the minimum Database Schema version required for this TopTeam Web Application Server version.
04Nov15 – is the release date of this TopTeam Web Application Server.
IMPORTANT: If the currently installed TopTeam Database Schema version is lower than the TopTeam Database Schema version required for the new TopTeam Web Application Server, this server is not correct for you. Download a lower TopTeam Web Server version that is compatible with your current TopTeam Database Schema.
Another option is to upgrade TopTeam Database Schema to the version required by the new TopTeam Web Application Server. In that case, you may need to upgrade other components of TopTeam as well such as TopTeam Desktop App, TopTeam Application Server, etc.
2. Install TopTeam Web Application Server from a zip file
2.1. Extract the files from the zip file to the installation folder
- Open the TopTeam Web zip file that you have downloaded.
- Extract the contents to the installation folder of your choice. We recommend that you extract the files to an empty folder.
2.2. Create a Management Console shortcut for TopTeam Web on Windows desktop
The following are the executable names for TopTeam Web Management Console:
- TopTeam Web ISAPI DLL for SQL Server Database: ttmISAPICp_SQL.exe
- TopTeam Web ISAPI DLL for Oracle Database: ttmISAPICp_Ora.exe
2.3. Rename the desktop shortcut
We recommend that you rename the desktop shortcut to TopTeam Web Application Server Management Console to differentiate it from the desktop shortcut of TopTeam Application Server Management Console.
3. Configure TopTeam Web Application Server using the Management Console
After installing TopTeam Web Application Server, you need to specify few configuration settings before it can be used. These settings are essential for TopTeam Web Application Server to connect to TopTeam database. You can configure these settings using the Configuration Wizard.
3.1. Run TopTeam Web Application Server Management Console
NOTE: Management Console for TopTeam Web Application Server is different from Management Console for TopTeam Application Server.
Double-click the executable or desktop shortcut (if any) to run TopTeam Web Application Server Management Console.
3.2. Start the Configuration Wizard (if not started automatically)
3.3. TopTeam Web Application Server Configuration Wizard opens
3.4. Read and accept TopTeam Web License Agreement
This page displays only if you run the configuration wizard for the first time.
3.5. Read and accept the CK Editor License Agreement
If you do not know the URL for TopTeam Web website, you can skip this step.
You can specify these settings later using the configuration wizard.
3.6. Specify the Database Connection Settings
Specify the settings for connecting to TopTeam Database Schema.
This page will be different for Oracle and SQL Server databases.
Refer to one of the steps below based on the database server you are using.
If TopTeam Application Server is running on the same computer, the wizard will automatically choose the appropriate database settings from TopTeam Application Server.
Connection Settings for Oracle Server
1. Specify Database Connection Settings:
a. Specify Username and Password for TopTeam Database Schema on Oracle.
b. Specify the name of Oracle Database Server where TopTeam User Database Schema is hosted.
If you do not find the required database server, you can directly enter its name.
2. Click Test Connection to test the database connection.
If the database connection test fails, please verify that the Database Connection Settings are correct.
Verify that you are able to connect to TopTeam Database Schema from this computer through other Oracle utilities like SQL* Plus, using the same Database Connection Settings.
3. Click Next if database connection test is successful.
Connection Settings for SQL Server
1. Specify Database Connection Settings:
a. Specify whether you want to use SQL Server Native Authentication or Windows Authentication.
We recommend that you use Native Authentication.
b. Specify Username and Password. This is NOT required if you are using Windows Authentication.
c. Specify the name of the TopTeam User Database.
d. Specify the SQL Server instance to use.
In case you are not able to view any server name in the drop-down list box, click Populate Servers.
If you do not find the required SQL Server instance in the list, you can directly enter the name of the SQL Server instance.
2. Click Test Connection to test the database connection.
If the database connection test fails, please verify that the Database Connection Settings are correct.
Verify that you are able to connect to TopTeam Database from this computer through SQL Management Studio, using the same Database Connection Settings.
3. Click Next if the database connection test is successful.
IMPORTANT: What to do if you decide to use Windows Authentication to connect to SQL Server?
TopTeam Web ISAPI Edition when hosted on a IIS Website runs under the credentials as a special Windows user account for running IIS Websites. If you want to use Windows Authentication, ensure that the Windows user account whose credentials will be used to run TopTeam IIS Website has the permissions to connect to TopTeam Database on SQL Server.
Clicking Test Connection will verify the connection settings using the credentials of logged in Windows user account. A successful connection does not guarantee that TopTeam IIS Website will also be able to connect to SQL Server.
We recommend that you consult your IT Support and database administrator regarding this.
You can also change the Windows user credentials that are used to run TopTeam Website using IIS Manager. This topic is not in the scope of this article.
We recommend that you use SQL Server Native Authentication. Use Windows Authentication only if it is mandatory according to your corporate policy.
3.7. Specify the User Data files folder
1. Specify the folder where the TopTeam User Data Files are stored.
You must specify the same folder that is used in TopTeam Application Server for storing User Data Files.
IMPORTANT: Ensure that the Windows user whose credentials will be used to run TopTeam IIS Website has “Write” permissions on this Folder.
2. Click Next to proceed.
3.8. Review and apply the Configuration Settings
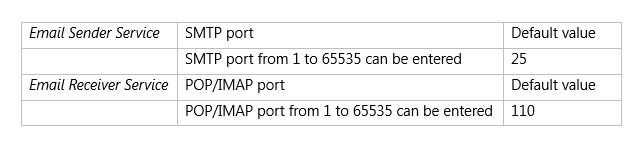
3.9. Configure Email Settings
3.10. Configuration of TopTeam Web Application Server is complete
If you want to configure Integrated Windows Authentication (SSO) on TopTeam Web, refer to the article How to configure Integrated Windows Authentication on TopTeam Web.
4. Create a Website for TopTeam Web on IIS Manager
To deploy TopTeam Web on IIS, you need to create a website on IIS.
Prerequisites
Ensure that IIS is installed on the computer.
To install, refer to the article How to install Internet Information Services (IIS) 7.
4.1. Open IIS Manager from Windows Start Menu
4.2. Stop Default Web Site, if it is not in use
We recommend that If Default Web Site is not in use, you stop the site.
1. Expand Sites.
2. Select Default Web Site.
3. Click Stop on the Actions Pane.
An alternate method to stop the website is from the right-click menu: Right-click the Default Web Site, select Manage Web Sites and click Stop.
4.3. Enable the ISAPI-dll feature in IIS
To run TopTeam Web in IIS, Execute permission needs to be granted to the ISAPI-dll feature.
Execute permission is required for ISAPI-dll to run on IIS Server.
Follow the steps from 4.3.1. to 4.3.4.:
4.3.1. Open Handler Mappings
4.3.2. Open Edit Feature Permissions
If you do not find an entry for ISAPI-dll in Handler Mappings, you need to first include ISAPI-dll services in IIS.
Refer to the article How to install Internet Information Services (IIS) 7.
4.3.3. Grant Execute Permission
4.3.4. ISAPI-dll feature has been enabled
4.4. Add a Website for TopTeam Web
The Add Website window will open.
4.4.1. Enter Website details
NOTE: The Website name entered in the Site name edit box is different from the Website address that you use in the web browser to access the Website.
4.4.2. Website has been created for TopTeam Web Application Server
4.4.3. Enable Content Compression
NOTE:
1. If Enable dynamic content compression option is disabled, it indicates that this feature is not installed on IIS Manager. In that case, go to “Turn Windows features ON or OFF” section of Windows Control Panel and turn ON the Dynamic Content Compression of IIS.
2. Uncheck Enable static content compression option for Windows 2012 Operating System and above.
4.4.4. Set Response Headers
TopTeam Web downloads application files (JavaScript, images, CSS, etc.) from the web server. These files must be cached by browser for optimal performance.
4.4.4.1. Open HTTP Response Headers feature
4.4.4.2. Add HTTP Response Headers
4.4.4.3. Add header – Cache-Control
Specify the values for:
Name: Cache-Control
Value: private,max-age=2592000
NOTE: The value of the “max-age” directive must be in seconds. Recommended value is 2592000 i.e. the number of seconds in 30 days. The value must always be specified only in terms of seconds for the number of days.
4.4.4.4. Cache-Control header has been added
4.5. Grant Execute permission to TopTeam Web Application Server – ISAPI edition
This will open the ISAPI and CGI Restrictions page.
4.5.1. Locate TopTeam Web Application Server dll
4.5.2. Locate and open “ttmRestSrv.dll” file
4.5.3. Check Allow extension path to execute
4.5.4. Execute permission has been granted to TopTeam Web (ttmRestSrv.dll)
4.6. Open Authentication settings for TopTeam Web
4.6.1. Edit Anonymous Authentication
4.6.2. Change Anonymous user identity to Application pool identity
4.6.3. Edit Advanced Settings of Application Pools for TopTeam Web
4.6.4. Configure Advanced Settings as shown in the image below:
If your computer is 64 bit, you need to set Enable 32-Bit Applications as True.
4.6.5. Create Application Pool for “ttmRestSrv.dll”
You can also right-click the Name column and select Add Application Pool.
4.6.5.1. Enter Application Pool name
4.6.5.2. Application Pool has been created
4.6.5.3. Configure Advanced Settings for “TopTeamRESTAPI” Application pools
4.6.5.3.1. Configure Advanced Settings as shown in the image below:
NOTE: If you are using TopTeam Web Application Server for SQL Server Database with Windows Authentication, set windows Username and Password in the Application Pool identity.
4.7. Specify a Default Document for the Website
4.7.1. Add Default Document for TopTeam Web
4.7.2. Enter Name tsApp.html
4.7.3. The Default Document for Website has been created
NOTE: Ensure that tsApp.html is the first document in the list. Use Move up option to move tsApp.html to the top of the list.
4.8. Add JSON MIME Type to IIS
4.8.1. Click TopTeam Web website and open MIME Types
4.8.2. Click Add in MIME Types
4.8.3. Add JSON MIME Type
JSON MIME Type will be added to the list.
4.9. Convert to Application
4.9.1. The Add Application window opens. Select the Application pool.
4.9.2. The rest folder has been converted to application
4.9.2.1. Open the Authentication settings for the rest folder
4.9.2.2. Edit Anonymous Authentication
4.9.2.3. Change Anonymous user identity to Application pool identity
4.10. Create Application Pool for generating Document
TopTeam Web version 13.33 and above supports Document Generation. For better performance we recommend that you create a separate Application Pool that will be used to generate document from TopTeam Web.
For more information, refer to the article Configuring Application Pool in Internet Information Services (IIS) Manager for generating document from TopTeam Web.
4.11. Start TopTeam Web Website
4.11.1. TopTeam Web Website starts
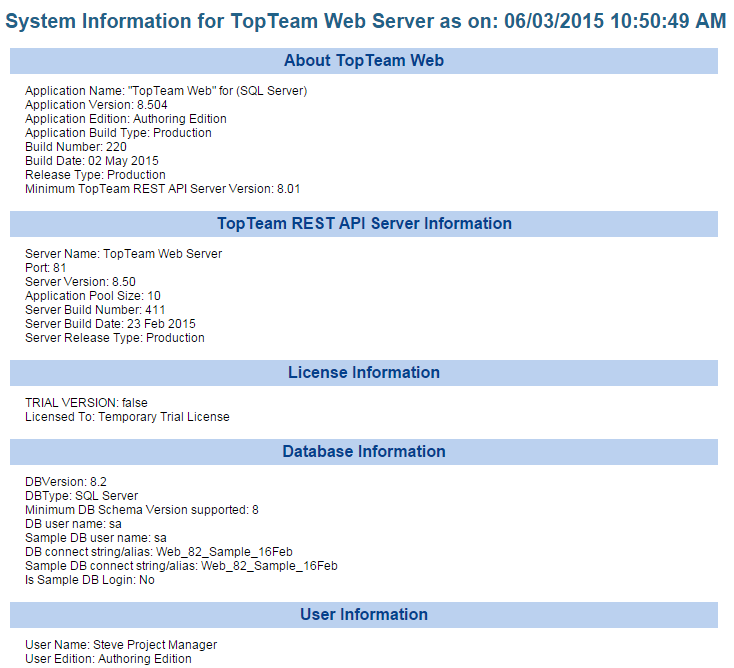
4.11.2. Test Website
4.11.3. TopTeam Web Login page displays
If the TopTeam Web Login page displays in the browser, this means that TopTeam Web Website has been created successfully using IIS manager.
You have successfully installed and configured TopTeam Web on this computer.
However, if you encounter any problems during installation, refer to the article TopTeam Web Server Startup Verification Checklist and check for possible causes of the problem.
If the problem still persists, contact TechnoSolutions.
See Also
TopTeam Web Server Startup Verification Checklist
Configuring TopTeam Web Server log information settings
Configuring Email Settings on TopTeam Web Server
How to configure Integrated Windows Authentication on TopTeam Web
Configuring External Authentication in TopTeam
How to configure IIS 8.0 for accessing TopTeam Application Server via HTTP/HTTPS
Revised: September 19th, 2019