Overview
This article describes the step-by-step process for configuring security in TopTeam.
Who should read this?
- TopTeam Administrators
- Project Administrators
To configure TopTeam security we will start with adding new User Accounts and then proceed with defining security roles, granting permissions to roles and assigning roles to project Team Members.
Add new User Accounts
Step 1. Navigate to the Administration screen

Step 2. Click Manage User Accounts
Step 3. Click Manage User Accounts (Internal or External)
Step 3. Add User Accounts
1. Click New User to create a new User Account.
2. To make a new user a System Administrator, select the checkbox for System Administrator. System Administrators have all privileges.
3. Email Ids are used for receiving and sending notifications from TopTeam.
4. A user’s Password can be changed using Reset Password.
5. Access can be denied temporarily for the User Account by selecting the Disable Login checkbox.
6. A User Account can also be inactivated by selecting the Inactive checkbox.
Configure System Security
Step 1. Click Configure System Security
Step 2. Open the Define Security Roles (Groups) editor
Step 3. Create Security and Workflow Roles as needed
Step 4. Enter a Name and Description for the Role
Grant Permissions to Roles
Step 1. Click Grant Permissions to Roles (Groups) to open its editor
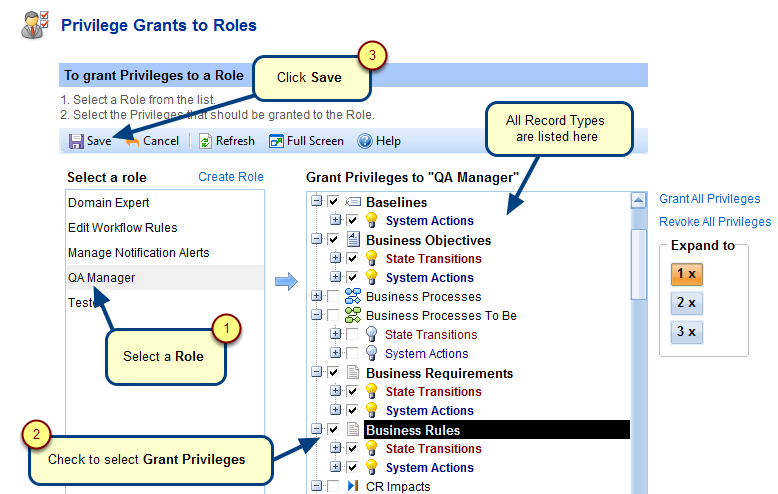
Step 2. Grant Privileges to Roles
Assign Roles to Project Team Members
Step 1. Click Configure Projects on the Administration screen
NOTE: When you create a new Project, by default the Project security restrictions are off. In other words, Project Team Members are free to edit any records within that Project until you “Turn Project Security ON”.
If you do NOT wish to enforce security in a Project, you can skip this and subsequent steps.
Step 2. Click Assign Roles to Project Team Members
Step 3. Assign Role(s) to Team Members
Revised: March 15th, 2018