Overview
This article explains how to deploy different instances of TopTeam Desktop App using TopTeam Auto Update feature. For this, you need to deploy multiple instances of TopTeam Desktop App for Production and Testing Environment.
We assume that the TopTeam Auto Update feature is up and running for your Production Environment and you are trying to setup another instance of TopTeam Auto Update for your Testing Environment.
Who should read this?
- TopTeam Administrators
- System Administrators
- IT Support
Preparations
- We assume that your TopTeam Production and Test Environment are on different computers/servers.
- Your TopTeam App Launcher setup for Production Environment is already set up. If not, set up the environment with the help of the article Deploying TopTeam Auto Update feature step-by-step.
Step 1. Deploy TopTeam Auto Update App on your Test Environment
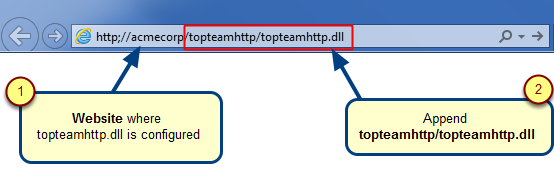
For information on deploying Auto Update App on IIS, refer to the article How to setup TopTeam App Distribution Website for Auto Update.
Step 2. Set up TopTeam Auto Update for Test Environment

Step 3. TopTeamAppDownloadsSetup window opens
Step 4. Clone or Copy-Paste all the files in this folder
Once the copy-paste action has been completed, follow the instructions below:
1. Rename the folders from “_Copy” to “TestEnvironment“.
2. Rename the “DefaultConnectionSettings_Copy.cnf” file to “DefaultConnectionSettings_TestEnvironment.cnf”
3. Rename the “DesktopApp_Copy.cnf” file to “TestEnvironment.cnf“.
Ensure that the names of the folders highlighted in the image must match exactly.
Step 5. Open the “TestEnvironment.cnf” file for editing
Step 6. “TestEnvironment.cnf” file opens in Notepad
Step 7. Open the “DefaultConnectionSettings_TestEnvironment.cnf” file in Notepad for editing
Step 8. Install TopTeam App Launcher on any one computer in Interactive Mode
For information, refer to the article Installing TopTeam App Launcher in Interactive Mode.
Step 9. Open the “Desktop Launcher” folder
Step 10. “Config.ini” file opens in Notepad
Step 11. Run TopTeam App Launcher.exe for your Test Environment
Step 12. Distributing TopTeam App Launcher to co-workers
Follow the steps below:
1. Go to the Desktop Launcher folder and create a zip file.
2. Share this file with your co-workers and ask them to extract and run TopTeamLauncherApp.exe
3. Shortcut for your Test Environment will be created on your Desktop.
Revised: August 10th, 2018