What is this article about?
This article describes the procedure for installing Visual Use Case on a computer using application installer.
Who should read this?
– Visual Use Case Users
– System Administrators / IT Support
Where is Visual Use Case installed?
Visual Use Case is a Windows desktop client application and it should be installed on Visual Use Case user’s personal computer (Desktop or Laptop).
Do you need to have Windows Administrator privilege to install or run Visual Use Case?
VIsual Use Case does NOT require Windows Administrator privilege to install or run the application.
Prerequisites
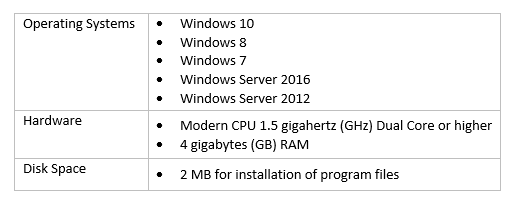
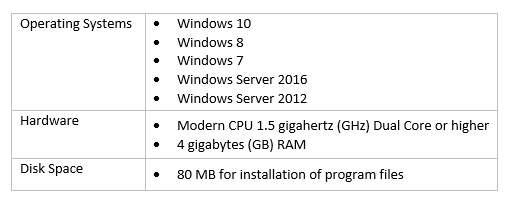
Refer to the article System Requirements for Visual Use Case and ensure that the computer where you want to install Visual Use Case meets the requirements.
Preparation
Download the Visual Use Case installer from the link you have received in the email or has been provided to you by our sales or support department.
Login to your Windows Account and Run the Visual Use Case Installer
Run Visual Use Case installer by double-clicking the installation file.
The installer file name format is: VisualUseCase_Installer_DDMONYY.exe
e.g. VisualUseCase_Installer_09Nov12
Welcome Page
Click Next to begin the installation.
Read and accept Visual Use Case Agreement
Choose Installation folder
Choose Application Settings folder
Application settings folder is the location where the application settings such as preferences, templates, grid themes, bookmarks, etc. are stored. Ensure adequate disk space is available in this folder.
Windows Application Data Folder:
We recommend that you choose Windows Application Data Folder If you do not have “Windows Administrator” privileges.
Application’s Installation Folder:
You can choose this option if you have “Windows Administrator” privileges on this computer.
Custom Folder:
Specify a folder where Visual Use Case data should be stored.
NOTE:
To save settings in the installation folder or custom folder, you should have write permission on that folder.
Choose Database folder
Database folder is the location where the repository data is stored. Ensure adequate disk space is available in this folder.
Windows Application Data Folder:
You must have read and write access to this folder. When in doubt we recommend that you select Windows Application Data Folder.
CAUTION: DO NOT USE this option if Visual Use Case will be run from another Windows User Account.
Application’s Installation Folder:
You can choose this option if you have “Windows Administrator” privileges on this computer. You will have write access on this folder
Custom Folder:
Specify a folder where Visual Use Case data should be stored. It has write access.
Review the installation summary, then click “Install”
Installation Progress
Click “Finish” to exit the Installation wizard
Visual Use Case shortcut on Windows Desktop
Visual Use Case’s shortcut in Windows Start Menu
Visual Use Case is launched
Select the User Data or Sample Data and you are ready to experience working with Visual Use Case
Revised:10th Nov, 2012

