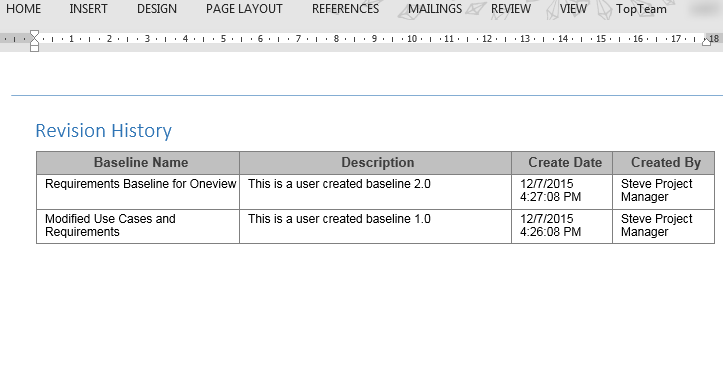
Overview
In this article, you will learn how to create or modify field layout formats in OneView. You will learn how to set up the format for a Compact View as well as a Detail View in a OneView document.
Who should read this?
- TopTeam Users
Step 1. Start the OneView Field Layout Wizard

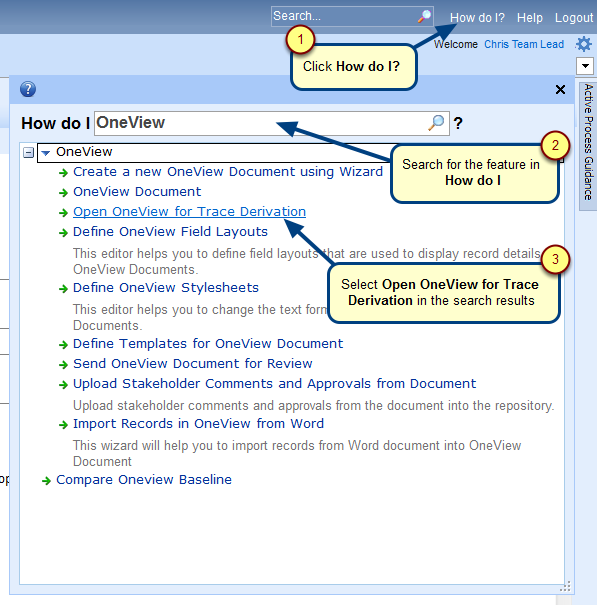
To know how to open this wizard, click here.
You can create two types of layouts: Tabular and Card Layouts.
This article explains creating a card layout. In a similar way you can follow the wizard for tabular layout and create a layout for it.
Step 2. Select a Record Type for which you want to create the field layout
Step 3. Specify the Title display format
This step determines the appearance of the record title in a OneView Document.
Step 4. Select the fields to be displayed in the Compact View
In the Compact View, only those fields will display that are selected on this screen. When you double-click a record in the OneView workspace, the record will change to the Detail View which is set up in the following screen of the wizard.
Step 5. Select the fields to be displayed in the Detail View
In this step, add the additional fields you want to display in the Detail View following the instructions used for the Compact View. These fields, along with those selected in the Compact View will display when a record is expanded to show the Detail View.
Step 6. Select which field captions you want to display
You can turn off field captions (field names) by unchecking the boxes in this screen. In the document, in either Compact or Detail View, the fields will display without a caption or label.
Step 7. Enter the Name of the new OneView Field Layout
Once Create is clicked, the document will change to the new layout defined by this wizard.
To edit a field layout, click the Edit Field Layout action and follow the wizard to make desired changes. The steps are similar as shown in this article.
See Also
Revised: July 13th, 2021